A trailer that pulls straight on an empty lot can still have brake trouble waiting to show up under a loaded haul. Uneven braking, a seized caliper, an air leak, or worn linings can turn a routine run into a roadside delay, a failed inspection, or worse. Knowing how to inspect trailer brakes gives operators a practical way to catch problems before they take equipment out of service.
The right inspection depends on whether the trailer uses electric brakes, air brakes, hydraulic disc brakes, or a combination of systems. The basic objective stays the same: confirm the brakes apply evenly, release fully, have enough usable friction material, and do not show signs of heat damage, leakage, or mechanical wear.
Start With a Safe Setup
Park on firm, level ground whenever possible. Set the parking brakes on the towing vehicle, chock the trailer wheels, and disconnect the trailer only when it is secure. If wheels need to come off, support the trailer with properly rated jack stands. Never work under or around a raised trailer supported only by a jack.
Before getting tools out, do a quick walk-around. Look for loose wiring, damaged air lines, hanging hoses, cracked brake chambers, wet hubs, missing wheel fasteners, and signs that one wheel has been running hotter than the others. A burnt smell, discolored wheel, melted grease cap, or dark streaking around a hub deserves immediate attention.
For commercial equipment, build this walk-around into the pre-trip routine. It takes minutes and can prevent a loaded trailer from leaving the yard with a brake issue already in progress.
How to Inspect Trailer Brakes at the Wheels
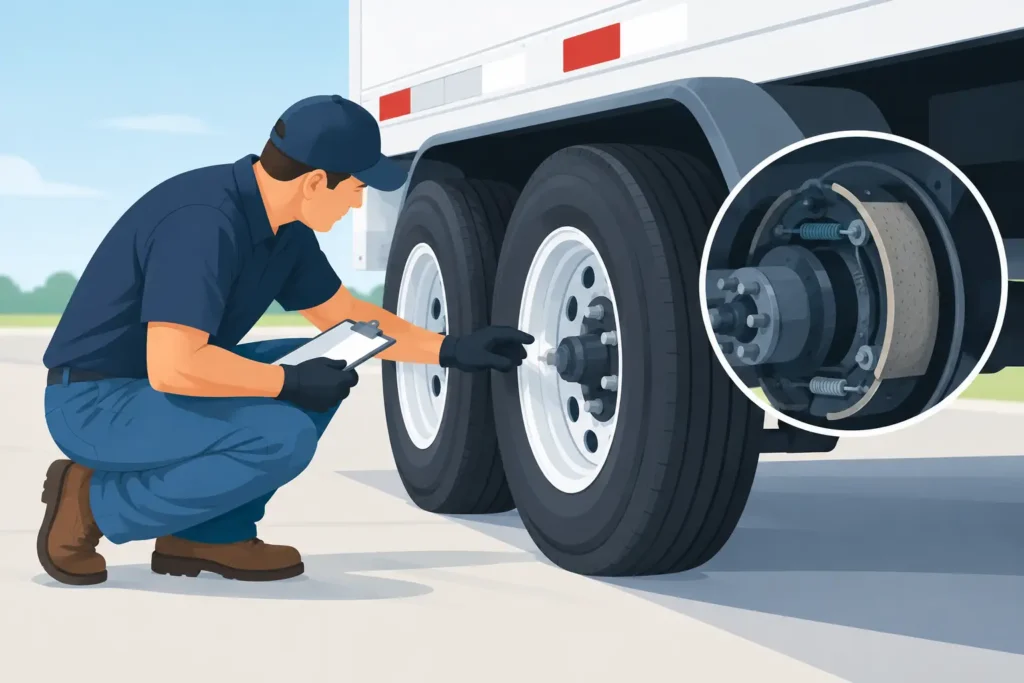
A proper wheel-end inspection usually requires removing the wheel and drum or accessing the caliper, depending on the brake design. This is where a visual check becomes a real maintenance inspection.
Inspect brake shoes, pads, and linings
On drum brakes, inspect the shoes and friction linings for remaining thickness, even wear, cracks, glazing, loose material, or contamination from grease, oil, or brake fluid. A lining that is oil-soaked or cracked should not be cleaned up and put back into service. Replace it and correct the source of contamination.
Look for uneven wear from side to side. One shoe worn much thinner than the other can point to an adjustment problem, a sticking actuator, a damaged camshaft, worn anchor points, or hardware that is not allowing the shoe to move correctly.
On disc brake systems, inspect both inner and outer pads. Uneven pad wear often indicates a seized slide pin, sticking caliper, or restricted hydraulic function. Check the rotor for heavy scoring, cracking, heat spots, blue discoloration, or a pronounced outer lip. A damaged rotor can reduce braking performance even when the pads appear serviceable.
Check drums, rotors, and hardware
A brake drum should be free of deep grooves, heat checking, and cracks. Minor surface marks may be acceptable, but visible cracks or significant heat damage mean the drum needs closer measurement or replacement. Also inspect the drum mounting surface and wheel studs for damage.
Check return springs, retainers, rollers, clips, and other hardware. Springs that are stretched, corroded, or broken can keep the brakes from releasing correctly. On air-brake trailers, inspect the S-cam, bushings, slack adjusters, and clevis pins for excess movement. Worn components create slack and reduce available braking force.
Spin the hub by hand with the brake released. It should rotate freely without grinding, dragging, or excessive resistance. Some light contact can occur depending on the system, but a wheel that is clearly binding needs to be repaired before it returns to work.
Look for bearing and seal trouble
Brake issues often start at the hub. Check for grease around the back of the hub, inside the wheel, or on the brake components. A leaking hub seal can contaminate brake linings and quickly reduce stopping power. Check for bearing play by safely lifting the wheel and rocking it at the top and bottom. Noticeable movement, rough rotation, or noise can indicate bearing wear or incorrect adjustment.
A failed bearing does more than create a wheel-end repair. It can damage the hub, spindle, brakes, and tire, putting a loaded trailer down at the worst possible time.
Inspecting Electric Trailer Brake Systems
Electric trailer brakes are common on utility, equipment, and smaller commercial trailers. They rely on the tow vehicle brake controller, trailer wiring, magnets, drums, and mechanical brake adjustment all working together.
Start at the connector. Check for bent pins, corrosion, loose terminals, damaged insulation, and wires that have rubbed through on the frame or suspension. A weak ground can cause intermittent braking that is difficult to trace on the road. Make sure the ground connection is clean, secure, and attached to bare metal where required.
With the trailer connected, use the brake controller manual override at low speed in a safe area. The trailer should apply smoothly and evenly. If it pulls, jerks, locks up, or shows little braking force, do not assume the controller setting is the only issue. Inspect the wiring and individual brake assemblies.
At each wheel, inspect the brake magnet for uneven wear, cracks, damaged wires, or grooves worn into its contact surface. A worn magnet may not apply enough force. Check the inside face of the drum where the magnet rides as well. If the surface is badly scored, the magnet and drum may both require service.
Most electric drum brakes also need periodic manual adjustment unless they are self-adjusting. Excessive shoe-to-drum clearance increases pedal travel and reduces brake response. Follow the trailer and axle manufacturer procedure for adjustment rather than tightening by feel alone. Over-adjustment causes dragging brakes, heat buildup, and premature wear.
Inspecting Air Trailer Brake Systems
Air brake inspections require attention to both the pneumatic system and the mechanical brake components. Start by checking air lines, glad hands, seals, and fittings for cuts, abrasion, loose connections, or audible leaks. With the system charged, listen closely around fittings, tanks, and brake chambers. A small air leak can become a serious operational problem when the trailer is working all day.
Check that the trailer air supply and service lines connect correctly and that the trailer charges to operating pressure. Apply the brakes and confirm the chambers extend evenly. Damaged or corroded brake chambers, leaking diaphragms, and bent pushrods should be repaired promptly.
Measure pushrod travel according to the applicable brake type and adjustment limits. Excessive stroke is a common warning that the brakes are out of adjustment or components are worn. Automatic slack adjusters are not a reason to skip this step. If an automatic slack adjuster repeatedly needs manual adjustment, there is usually a mechanical issue that needs diagnosis.
Inspect the slack adjuster and clevis connection for worn pins, missing retainers, or excessive play. Then inspect the S-cam and bushings. A worn camshaft can prevent proper shoe contact and cause uneven braking even when the linings still look usable.
Test Brake Performance Before the Trailer Goes Back to Work
After reassembly, torque wheel fasteners to the manufacturer specification and perform a controlled functional test. Start in an open area at low speed. Apply the brakes gradually, then more firmly. The trailer should stop in a straight line without grabbing, pulling, shuddering, or unusual noise.
For electric brakes, verify that the brake controller provides appropriate trailer braking without lockup. For air brakes, confirm system pressure builds and holds correctly, the trailer brakes apply and release as expected, and no new air leaks are present. Recheck wheel ends after a short run. A noticeably hotter wheel than the others can indicate a dragging brake or bearing issue.
Do not use a road test as a substitute for inspection. A trailer can feel acceptable while one axle contributes very little braking force. That extra stopping load transfers to the truck, increases wear, and becomes much more noticeable when the trailer is loaded or conditions turn wet.
When a Professional Inspection Makes More Sense
Routine visual checks are manageable for experienced operators, but some findings call for shop-level diagnosis. Repeatedly hot hubs, uneven tire wear, air-pressure loss, brake pull, hydraulic leaks, ABS faults, damaged chambers, and recurring electric-brake problems should be addressed before they grow into downtime.
Heavy equipment trailers and commercial hauling trailers also see higher loads, more frequent cycles, and rougher jobsite conditions than occasional-use trailers. That changes the maintenance schedule. A trailer moving excavators, skid steers, aggregate, or demolition material may need closer brake attention than one used for light seasonal hauling.
Tilling’s Repair Centre Vars helps Ottawa-area contractors and fleet operators diagnose trailer brake problems, repair wheel ends and air systems, and keep working equipment ready for the next haul. Planned service is usually faster and less expensive than losing a loaded trailer on the side of the road.
Treat brake inspection as part of the job, not an extra task for a quiet day. A few careful checks before dispatch can protect the driver, the load, and the schedule that depends on both getting where they need to go.